Step 1 - Localize text and texture content
In this step of the tutorial you learn how to add resources to a localization table, how to prepare the text content in your Kanzi application for the translators, and how to add the translated text content to your Kanzi application. You also learn how to create a trigger to change locales and how to localize the texture in your application.
Assets for the tutorial
The starting point of this tutorial is the Localization.kzproj Kanzi Studio project file stored in <KanziWorkspace>/Tutorials/Localization/Start/Tool_project directory.
The assets you use in this tutorial are stored in <KanziWorkspace>/Tutorials/Localization/Assets:
- Fonts directory contains the fonts that include the Japanese, Chinese, and Korean glyphs.
- Images directory contains the images that you use for the locales.
- Text directory contains the .po files that contain the translated text content of the starting point project.
The <KanziWorkspace>/Tutorials/Localization/Completed/Tool_project directory contains the completed Kanzi Studio project of this tutorial.
Add resources to a localization table and import the translations
To add resources to a localization table and import the translations:
- Open the Kanzi Studio project located in <KanziWorkspace>/Tutorials/Localization/Start/Tool_project/Localization.kzproj. The project contains a layout on which to build your application, the text resources for the English locale, a texture to localize, and a state manager to control the selection bar when you toggle between the different locales.
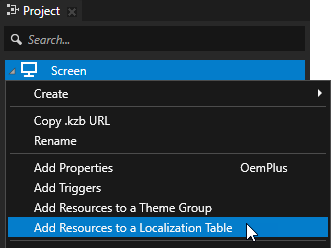
- In the Project right-click the Screen node and in the context menu select Add Resources to a Localization Table.
When you use the Add Resources to a Localization Table command on the Screen node, Kanzi Studio enables you to add all resources in your project to a localization table and localize them. To add to a localization table resources only for a selected node and its tree, right-click that node and select Add Resources to a Localization Table.
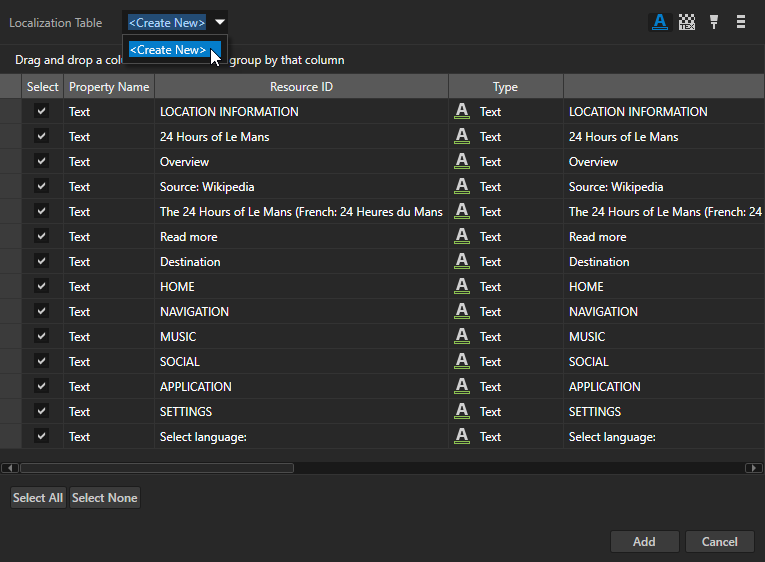
- In the Add Resources to a Localization Table window set:
- Localization Table to the localization table to which you want to add the resources. If you do not have a localization table yet, select <Create New>.
A localization table contains the information about which locale uses which resources. - In the top right part of the window you can select which types of resources you want to show in the window. By default Kanzi shows the text resources
 in the project.
In this step of the tutorial you localize only the text resources. You localize other types of resources in the next step. - Click Select All to select all listed resources.
Use the checkbox next to each resource to select that resource. To select or deselect all resources use the buttons in the bottom left part of the window. - Click Add.
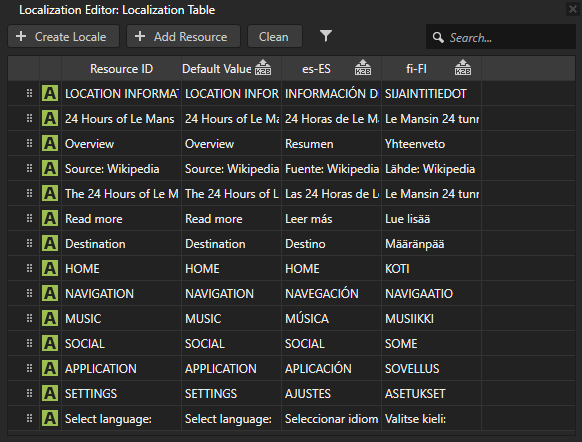
Kanzi Studio creates resources and resource IDs from all resource types you selected and adds them to the localization table you selected. You can find the localization tables in the Library > Localization. You can now localize resources and in the localization table set which resource you want to use for which locale.
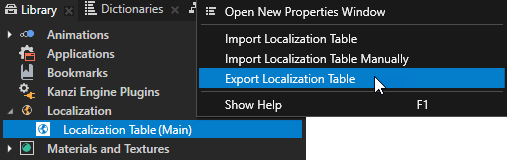
- In the Library > Localization right-click the localization table Localization Table (Main) and select Export Localization Table.
Kanzi Studio exports the localization table template in a .pot file format to the <ProjectName>/Localization/<LocalizationTableName> directory.
When you localize your Kanzi application for the first time, send that .pot file to the translators. This is the template file that contains the strings and their context for each text resource in a localization table.
Translators use the .pot template file to translate the text content for each locale. Result of their translation is one .po file for each locale. For this tutorial you can find the translated .po files with the Finnish (fi-FI locale) and Spanish (es-ES locale) translations in the <KanziWorkspace>/Tutorials/Localization/Assets/Text directory. There you can also find the translated .po files for the Japanese, Chinese and Korean locales which you add as locale packs in the last step of this tutorial.
- In the Library > Localization right-click the localization table you exported, select Import Localization Table Manually, go to <KanziWorkspace>/Tutorials/Localization/Assets/Text, and import the .po files for the fi-FI and es-ES locales.
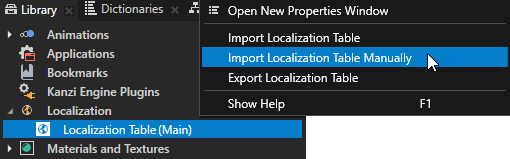
Kanzi Studio creates the locales specified in each .po file and adds the translations of the .po files to the localization table. Kanzi uses localization tables to store the localized text resources and information about which locale uses which project resources.
Double-click the localization table to open it and see the resources in the localization table.
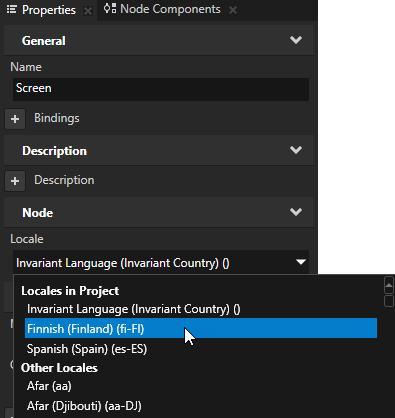
- (Optional) If you want to immediately see how each of the locales work in Kanzi Studio, in the Project select the Screen node, and in the Properties set the Locale property to the locale you want to see in the Preview.
Create triggers to change locales
You can change the locale in your Kanzi application by setting the value of the Locale property in the Screen node. In this section you create controls and use triggers to change the application locale. You also create a selection bar which shows when a locale is selected.
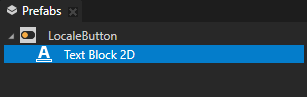
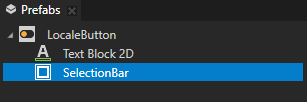
- In the Prefabs create a prefab for the locale selection toggle button:
- In the Prefabs click
 , select Toggle Button 2D, name it LocaleButton, and under it create a Text Block 2D node.
You use the trigger in the Toggle Button 2D node to set the locale and the Text Block 2D node to show the name of the locale in the interface.
- In the Prefabs select the LocaleButton, in the Properties add the Horizontal Alignment property, and set it to Stretch.
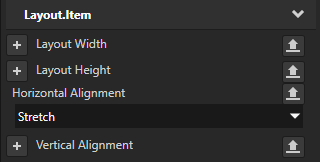
You set the locale buttons to span the size of the LocaleSelector stack layout node.
- Select the Text Block 2D node and in the Properties add and set:
- Horizontal Margin property Left property field to 30
- Horizontal Margin property Right property field to 30
- Vertical Margin property Top property field to 10
- Vertical Margin property Bottom property field to 10
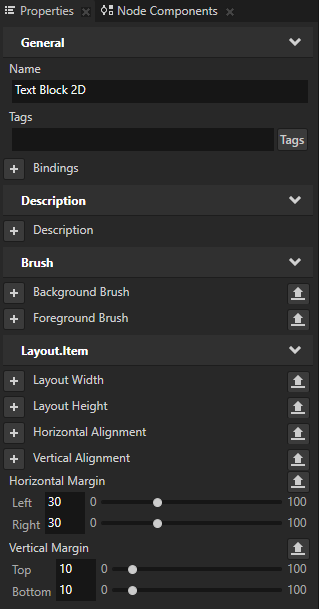
You set the margins of the Text Block 2D node to position the locale buttons in the application interface. - In the Prefabs select the Text Block 2D node and in the Properties next to the Text property click
 , and name the property Localization.LocaleName. This enables you to display a different text for each instance of the prefab.
When you click Kanzi Studio creates from that property a custom property, adds it to the root of the prefab, and creates a ##Template binding to the property in the prefab root. That way you can set in the root of the prefab instance the text you want the Text Block 2D node to show.
A prefab can contain a tree of nodes, each with their own properties. When you edit the nodes in a prefab or any of its instances in a project, you change those nodes in all instances of that prefab. However, you can customize individual instances of the prefab to have individual values by overriding the values in the default prefab. For example, when you create a prefab for an address book entry you want to show a different name, number, and photo for each address book entry.
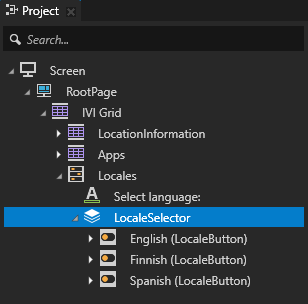
- From the Prefabs drag to the Project > RootPage > IVI Grid > Locales > LocaleSelector node three LocaleButton prefabs, one for each locale.
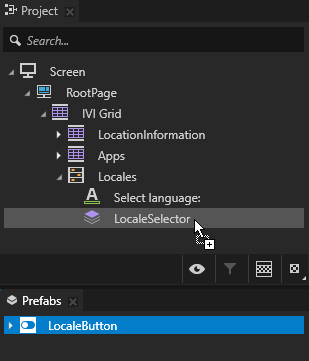
- In the Project select each instance of the LocaleButton prefab in the LocaleSelector node, press F2 and name each after the locale it sets.
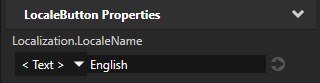
- In the Project select the first instance of the LocaleButton prefab in the LocaleSelector and set:
- In the Properties add the Localization.LocaleName property and set its value to the locale this instance of the prefab represents. This text you enter for the locale name is used in your Kanzi application.
For example, for the default locale set the value to English.
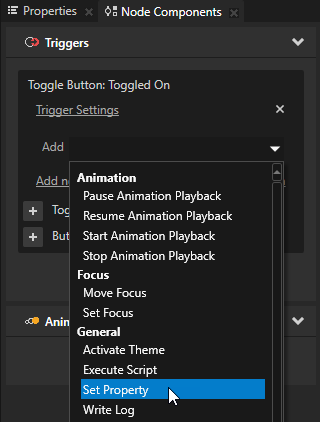
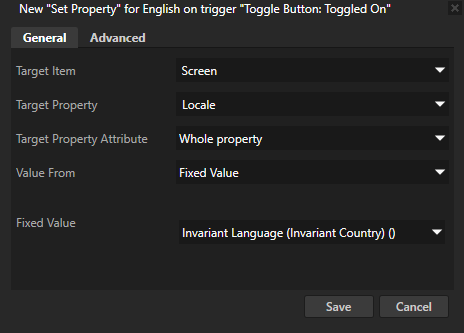
- In the Node Components add the Toggle Button: Toggled On trigger, add the Set Property action and set:
- Target Item to Screen
- Target Property to Locale
- Value From to Fixed Value
- Fixed Value to the locale you want to set with this button.
For example, to set to default locale, in this case English, select the Invariant Language (Invariant Country) () value.
Click Save.
- Repeat the previous step for the other two prefab instances and:
- For the Finnish locale set the Localization.LocaleName property to suomi and in the Toggle Button: Toggled On trigger set the Fixed Value to Finnish (Finland) (fi-FI).
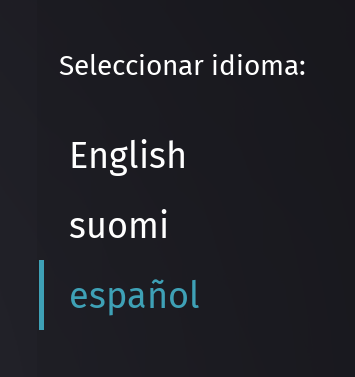
- For the Spanish locale set the Localization.LocaleName property to español and in the Toggle Button: Toggled On trigger set the Fixed Value to Spanish (Spain) (es-ES).
-
Create the selection bar which shows the selected locale:
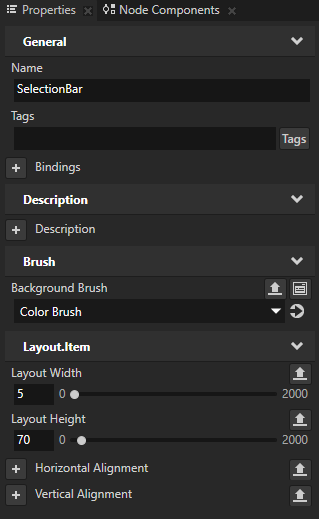
- In the Prefabs press Alt and right-click the LocaleButton prefab, select Empty Node 2D, name it SelectionBar, and in the Properties set:
- Background Brush to Color Brush
- Layout Width to 5
- Layout Height to 70
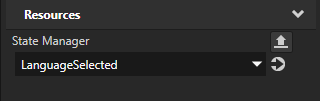
- In the Prefabs select the LocaleButton prefab, in the Properties add the State Manager property, and set it to LanguageSelected.
You use the state manager to control the selection bar when you toggle between the different locales.
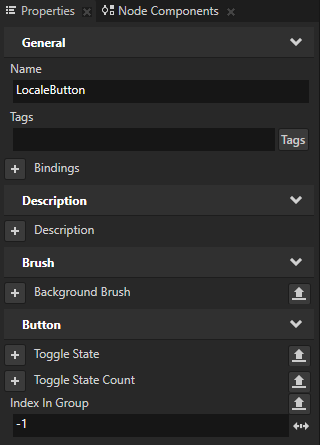
- In the Prefabs select the LocaleButton prefab, in the Properties add the Index in Group property, and set it to -1.
Kanzi uses the Index in Group property to keep track of which Toggle Button is selected in a Toggle Button Group node. When the value of the Index in Group property is -1 the Toggle Button Group node sets the index for that Toggle Button.
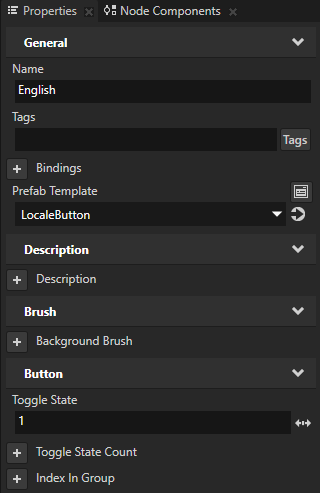
- In the Project select the instance of the LocaleButton prefab which sets the English locale, in the Properties add the Toggle State property and set it to 1.
This way you set the English locale button selected by default when you start your application.
When you click the locale name, Kanzi Studio changes the text in the application to that locale and displays the selection bar on the left side of the selected button.
Use a different texture for each locale
The application contains a texture which you localize to use a different image for each locale.
To localize images:
- From <KanziWorkspace>/Tutorials/Localization/Assets/Images import the images to the project.
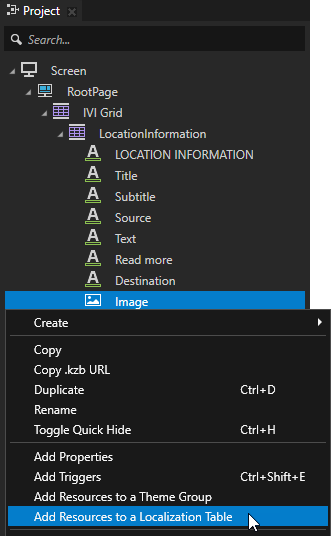
- In the Project > RootPage > IVI Grid > LocationInformation right-click the Image node and select Add Resources to a Localization Table.
To add resources to a localization table for only the selected tree of nodes, right-click the top node in the tree and select Add Resources to a Localization Table. Kanzi Studio shows in the Add Resources to a Localization Table window only the resources used in that tree.
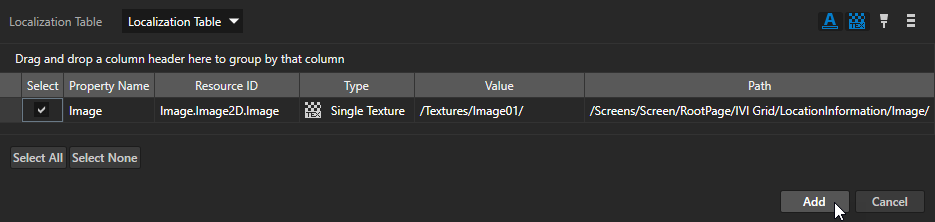
- In the Add Resources to a Localization Table window set:
- Localization Table to Localization Table.
Select the same localization table you created earlier in this step of the tutorial. - Select
 to show the texture resources in the selected node and select Image.
 - Click Add.
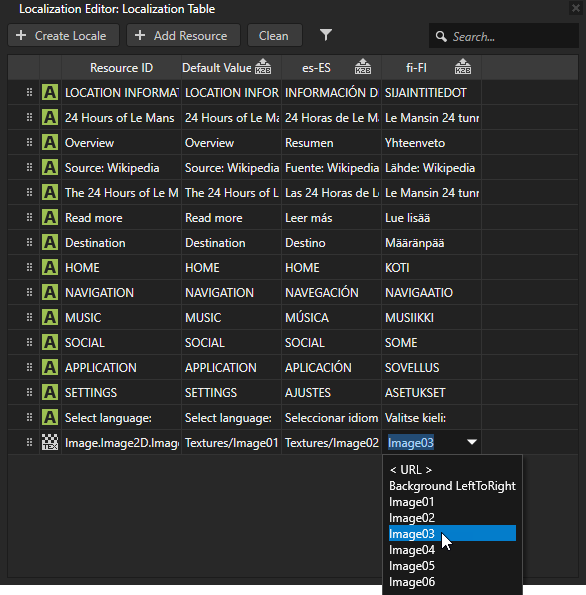
- In the Library > Localization double-click the Localization Table (Main) localization table to open the table in the Localization Editor and in the Localization Editor in the column for each locale select the image you want to use for that locale.
For example, for the Spanish locale use Image02 and for the Finnish locale use Image03.
If you do not select a resource or value for a locale, Kanzi uses the default resource or value for that locale. The default value is listed in the Default Value column.
< INTRODUCTION
NEXT STEP >
See also
Localizing applications
Using locales
Using the Button nodes
Using state managers

Open topic with navigation